Latest Postings
January 7, 2026
Revamped ISInc Website: Faster, More Intuitive IT Training Platform
We are proud to launch the revamped ISInc website at https://www.ISInc.com — a modern, faster, and more user-friendly platform designed specifically for our business and IT training customers.
This revamped ISInc website delivers significant improvements in search functionality, site speed, and mobile responsiveness while preserving the complex architecture that has powered our extensive course catalog for decades.
The Journey Behind the Revamped ISInc Website
For years, we explored options to modernize the site and consulted multiple web development agencies. Nearly all advised that upgrading to the latest version of PHP would require a complete ground-up rewrite due to the site’s sophisticated structure. Determined to find a better path, our sales team took matters into our own hands. With limited prior coding experience, we successfully migrated to current PHP standards in just one week — proving that deep system knowledge can overcome perceived obstacles.
Key Enhancements in the Revamped ISInc Website
- Brand-New Design – Clean, contemporary layout that maintains professional standards and improves readability on all devices.
- Improved Search Functionality – More accurate and faster onsite search, helping you quickly find the exact IT training courses, certifications, or resources your team needs.
- Faster Performance – Optimized code and the recent PHP upgrade (learn more about modern PHP benefits at the official PHP website) deliver significantly reduced load times.
- Enhanced Mobile Experience – Fully responsive design that works flawlessly on phones and tablets, so you can browse and register for courses anywhere.
These updates ensure the revamped ISInc website continues to support the advanced functionality our long-term customers depend on while offering a markedly better day-to-day experience.
We invite you to explore the revamped ISInc website today and see the difference for yourself. Your feedback is always welcome — feel free to contact us or leave a comment below.
Thank you for your continued partnership. We’re excited to support your team’s success with this upgraded platform and future enhancements to come.
—Mike Crawford and The ISInc Team
February 26, 2025
Many of you are either familiar or have heard of either Tableau or Microsoft Power BI.
At one point Tableau had advantages over Power BI, but with recent changes to the licensing structure for the Microsoft line and updates, (almost weekly), Power BI can do just about everything Tableau does. This all at the same time when Tableau drastically raised their pricing after being purchased by Salesforce.
Over the past 8 or so years, I have had the opportunity to work with dozens of State and County Departments to help implement custom dashboards and create customized classes.
During some discovery calls, I have customers say, “we’re going to utilize the Microsoft training first since it’s free. If we need something additional, we’ll contact you” or “we just want a 1-day class on how to build dashboards.”
I’m never disappointed, and always respond with something like, “No problem. We appreciate the opportunity to have talked with you and please keep us in mind for future classes”.
Fast forward a month or two later, I get a call they have exhausted the free Training from Microsoft as well as learn at your own pace options, which in no way satisfied their learning needs. Most equate it to the lack of labs or just the amount of information covered and connecting the pieces.
Ultimately, they still need training. We then work together to create a class, often times modifying the PL-300 class and it’s always a hit.
Well, it’s no surprise. What the heck is Power BI? Often, people think it is just an extension of Excel. They already know Excel so it should be an easy transition.
Not so fast. Power BI is actually a full suite of products/tools in Microsoft’s Business Intelligence line.
I thought I would give a very brief explanation below of what Power BI is.
Microsoft Power BI is a tool that helps you turn your data into easy-to-understand visuals and reports. It has three main parts: Power BI Desktop for creating reports, the Power BI service for sharing them, and Power BI Mobile apps for viewing them on the go. You can also make detailed reports with Power BI Report Builder and publish them on your own servers with Power BI Report Server.
Additionally, Power BI integrates with various external tools like DAX Studio for optimizing queries, ALM Toolkit for application lifecycle management, and Tabular Editor for advanced data modeling. It works with tons of different types of data and helps you see trends and insights clearly. With Power BI, you can make smart decisions based on your data.
Power BI is currently being implemented in many departments. If yours is one of them and you’d like to learn how we can help, or if you simply want to have a conversation to learn more about it, feel free to give me a call!
Have a great week. Let me know if this was helpful.
-Kris Crawford
August 28, 2024

What is Microsoft Copilot?
Copilot is an AI-powered productivity tool designed to enhance the way people work by integrating seamlessly with Microsoft 365 apps like Word, Excel, PowerPoint, Outlook, and Teams. It leverages large language models (LLMs) and data from Microsoft Graph to assist users in creating content, analyzing data, managing emails, and collaborating more effectively.
Key Features of Microsoft Copilot:
- Enhanced Productivity: Automates repetitive tasks, allowing users to focus on more strategic work.
- Creativity Boost: Helps generate ideas, draft documents, and create presentations with ease.
- Data Insights: Analyzes data and provides actionable insights, making data-driven decisions simpler.
- Seamless Integration: Works within the Microsoft 365 ecosystem, ensuring a smooth workflow across different applications.
Why Businesses Should Invest in Copilot Training:
- Maximize ROI: Training ensures that staff can fully utilize Microsoft Copilot’s capabilities, leading to better productivity and efficiency.
- Stay Competitive: Businesses that leverage advanced AI tools can stay ahead of the competition by optimizing their operations and decision-making processes.
- Employee Satisfaction: Reducing mundane tasks can lead to higher job satisfaction and morale among employees.
- Adaptability: As AI continues to evolve, trained staff will be better equipped to adapt to new features and updates, ensuring continuous improvement in workflows.
- Innovation: Empowering employees with AI tools can foster a culture of innovation, encouraging creative problem-solving and new ideas.
Investing in training for Microsoft Copilot can significantly enhance your team’s productivity and overall business performance. Would you like to know more about specific training programs or how to get started? Contact our sales team to learn how we can help your staff become proficient with Microsoft Copilot! Click here to see all available courses on Microsoft Copilot.
July 18, 2024

Power BI is a comprehensive suite of software services, apps, and connectors designed to transform disparate data sources into coherent, visually immersive, and interactive insights. Whether your data originates from an Excel spreadsheet or a hybrid combination of cloud-based and on-premises data warehouses, Power BI enables you to:
- Connect Easily: Access your data sources effortlessly.
- Visualize and Discover: Create compelling visualizations and explore what matters most.
- Share Insights: Collaborate by sharing reports and dashboards with anyone you choose.
The key components of Power BI include:
-
- Power BI Desktop: A Windows application for creating reports and models.
- Power BI Service: A cloud-based service for sharing and consuming insights.
- Power BI Mobile Apps: Available on Windows, iOS, and Android devices for on-the-go access.
Additionally, there’s Power BI Report Builder (for paginated reports) and Power BI Report Server (an on-premises report server). Depending on your role and project needs, you might use different elements of Power BI to achieve your goals. For instance, you can create customer engagement reports in Power BI Desktop, monitor real-time dashboards in the service, or even embed dashboards into custom applications using Power BI APIs. 🚀
Here are a few of our most popular Power BI courses:
New Visual Studio Workload Highlights Microsoft’s ‘Renewed Focus’ on WinUI
Developers doing Windows apps have a confusing arsenal of tools and frameworks to work with, but Microsoft is simplifying things a bit with a new Visual Studio workload that highlights the company’s “renewed focus” on the Windows UI Library (WinUI). Read the full article here.
If you or your team are looking for training to build apps, give us a call! Our expert instructors have been providing Visual Studio training for over 20 years! Let us tailor a class for your team to focus on what they need to accomplish. We have helped many organizations develop their own applications in-house instead of hiring expensive consultants, saving them time and money!

Excel Training in Sacramento
Remember, investing in Excel training not only benefits individual employees but also contributes to the overall success of the organization!
Why should you send your staff to Excel training?
- Enhanced Productivity: Excel proficiency streamlines data management, analysis, and reporting. Trained employees can work more efficiently, saving time and reducing errors.
- Data Accuracy: Proper training ensures staff understand Excel’s features, reducing the risk of data entry mistakes and improving overall accuracy.
- Advanced Functions: Training covers advanced functions like pivot tables, macros, and data visualization. These skills empower employees to handle complex tasks effectively.
- Cost Savings: Efficient use of Excel can lead to cost savings by automating repetitive tasks and optimizing processes.
- Certification Opportunities: Excel certifications (such as Microsoft Office Specialist) validate skills and enhance employees’ professional profiles.
- Customized Solutions: Trained staff can create custom templates, reports, and dashboards tailored to the company’s specific needs.
If you’re interested, reach out to us at ISInc! We offer public class dates, but you can also schedule a dedicated class for your staff, and we’ll tailor it to their needs so they can implement what they learn when they return to work!😊👍
Here are some of our most popular Excel classes:
August 22, 2012
One of the features of the Terminal Server/Remote Desktop Client in Windows 7/Windows Server 2008 is the support for multiple monitors. If the machine running the TS-Client has a multi-monitor configuration that creates one logical rectangle, then the TS-Client can span over all the monitors, creating one virtual desktop of the combined size.
Specifically, the client needs the following for span mode to work correctly:
o Equal resolution monitors
o Total resolution of all monitors not exceeding 4096 x 2048
o Top-left monitor being the primary So, with this basic setup, let’s jump right in!
Step 1. Check the basics
Make sure both your monitors are using the same resolution and are oriented horizontally. Right click on the desktop. Click Properties.

In the Display Properties tab, make sure the monitors have the same resolution and are oriented horizontally. If not, adjust your monitor resolution and position so they are.
Step 2. Get the right version of Remote Desktop client
Check if you have the right version of Remote Desktop Connection client. You need at least version 6.0In the Start Menu > Run… dialog, type “mstsc” and hit enter.
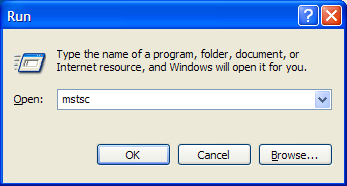
The acronym “mstsc” stands for “Microsoft Terminal Services Client” – another name for Remote Desktop Connection client. You can also start it from Start Menu > All Programs > Accessories > Remote Desktop Connection (or Accessories > Connections > Remote Desktop Connection)
The Remote Desktop Connection program should open up.
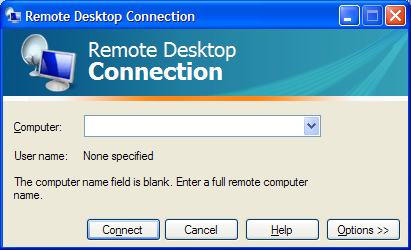
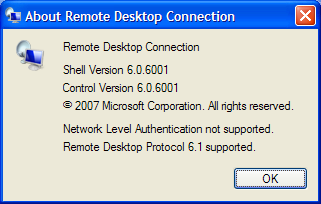
Click the monitor icon in the top-left corner of this dialog, and choose the “About” menu:
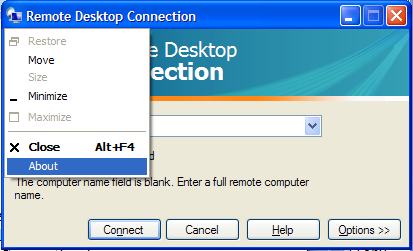
This will show the version of the Remote Desktop Connection client. It should be version 6.0 or higher:
If you have an older version, first download and install the newer version from http://www.microsoft.com/downloads/details.aspx?FamilyId=6E1EC93D-BDBD-4…
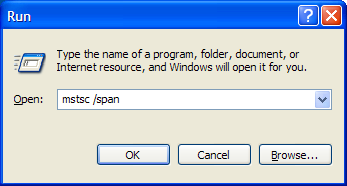
Step 3. Connect to remote computer in ‘span mode’
To have the Remote Desktop connection client use both your monitors, you need to start it in “span” mode. This is done by giving the following command in the Run dialog: mstsc /span
Open Start Menu, click Run. Then type in mstsc /span and hit Enter or Click OK
�
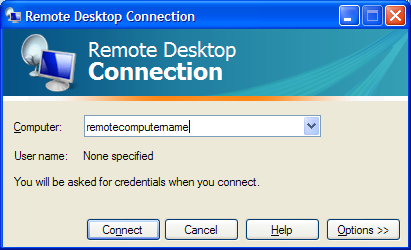
When the Remote Desktop client opens up, enter the remote computer name to which you are connecting, and click Connect.
The Remote session should open up and cover both your monitors.
Once you have this working, you may want to launch the remote session in an easier way instead of typing the ‘mstsc /span’ command everytime.
The next section shows how you can create an “RDP file”, so you can launch a spanned remote desktop session by just double-clicking a file/shortcut.
Creating an RDP file to launch a spanned remote desktop session covering multiple monitors
Create the RDP file
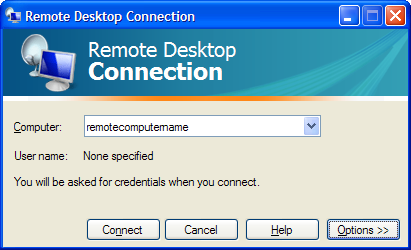
Open Start Menu, click Run. Then type in mstsc /span and hit Enter or Click OK
When the Remote Desktop client opens up, enter the remote computer name to which you are connecting, and DON’T click Connect. Instead, click the Options button.
The window will open up to reveal more options:
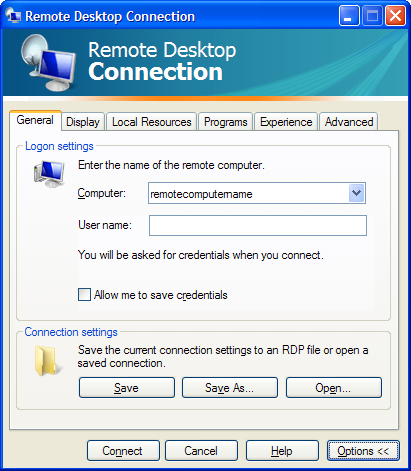
Click the “Save As” button. A “Save As” dialog will open to save the connection settings to a file. Save the file to a known folder, and with a name like remoteserver.rdp. In this example, let’s say we saved it to C:\remoteserver.rdp
Now, close the Remote Desktop Connection program. We are done with this for now.
Editing the RDP file
Open Windows Explorer, and browse to the folder containing the file you just saved (C:\remoteserver.rdp). Right click the file > choose Open With… menu > Choose Program…
In the Open With dialog, choose Notepad to open the file. Remember to NOT check/enable the “Always use the selected program to open this kind of file” option.
Click OK. The file should open up in Notepad. It is a file with many lines. We need to edit this and add one more line.
In the last line of the file, add the following command and hit Enter:
span monitors:i:1
The file should look something like this (note the last line added manually):
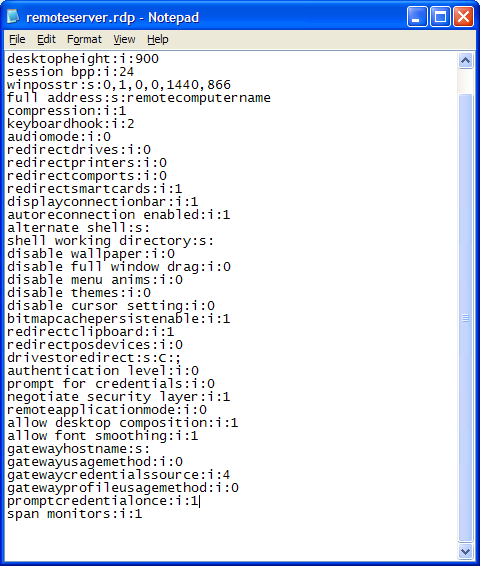
Save the file (File menu > Save) and exit Notepad.
Double click… and connect!
From now on, you can connect to the remote computer using both monitors (in span mode) by just double-clicking this file. To add a shortcut to your desktop, right click the file, and choose “Send To> Desktop (create shortcut)”. This will place a shortcut to this file on your desktop, and you can just double click the shortcut to remotely connect to the remote computer using multiple monitors in span mode.
July 23, 2012

Office 2013 will soon be here, along with a new and improved version of the cloud-based Office 365. If you’re looking to upgrade, you have to decide whether the traditional desktop version of Office is the way to go, or if Office 365 is a better fit for your needs.
Office 2013 is impressive, but Office 365 is a better value in most cases.
1. Cost
Microsoft hasn’t yet shared what the price tag will be for the new Office 2013. But, unless it follows the same bold path laid out in offering Windows 8 for a mere $40, history suggests the new productivity suite will start somewhere in the $150 neighborhood.
Office 365 plans start at $4 per month. Small businesses can get access to Exchange, SharePoint, and Lync in addition to the core Office productivity applications for only $6 per month. Larger businesses that want to take advantage of Active Directory integration can do so for $8 per user per month.
Breaking those down, it takes more than three years to reach $150 based on the $4 per month plan, and more than 18 months under the $8 per month plan. The 18 months is less time than a business typically gets out of an investment in the desktop Office software, but it also comes with more than the software itself.
Of course, those are the current subscription prices and plans for Office 365, so those figures are subject to change as well.
2. Updates and Maintenance
What else do you get with your Office 365 subscription? An IT department. Sure, you can set up your own Exchange Server, SharePoint Server, and Lync infrastructure. You can manage and maintain the desktop Microsoft Office software, and install the patches and updates every month yourself. How much will that cost?
Consider that implementing the same capabilities in-house requires servers, and network infrastructure, and IT personnel to install, manage, update, and maintain it all. Plus, you still have to buy and maintain the Office software itself.
With Office 365, Microsoft takes care of all the dirty work so you don’t have to. Updates, patches, and upgrades just happen in the background without you needing to worry about it. When the server crashes, its Microsoft’s problem. When a hard drive needs to be replaced, Microsoft will handle it. You get the benefits of using Office without any of the headaches of updating and maintaining it all.
3. Accessibility
Office 365 lives in the cloud. That means you have access to Word, Excel, Outlook, and other Microsoft Office tools from anywhere you can get a Web connection, and from virtually any device–Windows or Mac desktops and laptops, Android devices, iPhones, iPads, and other smartphones and tablets.
Office Web Apps provide basic features and functions for free.This isn’t quite the selling point it once was for a couple reasons. First, even with the desktop Office 2013 suite Microsoft is pushing users to save files to the cloud-based SkyDrive, or to a SharePoint server by default. So, there’s no reason the data can’t be accessible regardless of whether you choose Office 2013 or Office 365.
The second reason it may not be all that compelling is that Office Web Apps are already available for free from the SkyDrive site. So, even without Office 365 users can create, view, and edit Word, Excel, PowerPoint, and OneNote files from the Web.
For businesses, though, SharePoint, Active Directory, and other elements of Office 365 that go beyond simply creating and editing Office documents still make Office 365 a better value.
Your mileage will vary of course. There are a number of factors involved in calculating the cost of purchasing, installing, configuring, updating, and maintaining Microsoft Office and the accompanying back-end services versus the ongoing subscription costs associated with Office 365. Office 365 is a solid service providing tremendous bang for the buck, though, so it won’t be easy to beat the value it brings to the table.
August 30, 2011
While working remotely I noticed my bandwidth would drop when I connected to our VPN. It appeared that all internet packets were being routed through our VPN connection. While this normally wouldn’t be a problem, I often found myself downloading large files and my connection performance was limited to the available bandwidth to the VPN connection. That’s when I learned about what a “split tunnel” vpn connection is. I wrote this article to walk you through the process of setting up your VPN to take advantage of this option in Windows Networking.
With a “split tunnel vpn” connection, the internet traffic is routed through the local gateway connection. All other network traffic works through the vpn connection as you would expect. This is a feature that is available with Windows Vista and XP PPTP VPN connections, but it isn’t the default setting.
Here is how you configure your VPN connection to use the local gateway:
Step 1
Right click on your VPN connection and choose “properties”
Step 2
Click on the “Networking” tab. This is where we will need to make changes to the TCP/IP settings for your VPN connection. If you are using V6 IP addresses or V4, you’ll need to make the change in both locations just to be sure.
Step 3
Click on the “Advanced” button to get to the Advanced TCP/IP options
Step 4
The VPN connection by default configures all packets to route to the remote server’s gateway. We want to turn this option off by clicking on the “Use default gateway on remote network” option.
That’s it! Once you have made those changes you will notice your internet packets are no longer automatically routing through the VPN server.

January 15, 2009
Do you have staff in remote locations, and find it difficult to get them the training they need? There comes a time when your resource is too valuable to send off site for a class. This is where ISInc’s e-Learning can come into play. Now your students can access the same classes via their desktop computer.
ISInc’s e-Learning training is live, interactive online training for those who would like to attend one of our face-to-face instructor-led training courses without leaving their offices, homes or classrooms. Learners can listen to the presentation, ask questions, hear others’ questions and get live answers, all from wherever they choose. They can engage in discussions with others in the physical classroom and throughout the country who are involved in the same class session.
ISInc’s e-Learning training blends the best from traditional face-to-face instructor-led training with the latest in conferencing technology, allowing us to deliver live training to multiple locations at one time. This model is based on our over 27 years experience as trainers and the general premise that the classroom is the foundation of a great training experience.
All courses offered at ISInc can be taken online via our live e-Learning training using Microsoft Lync. So, if you have employees in remote offices that you are trying to schedule for IT training, consider ISInc e-Learning Training. Please contact us for more information.
For more information on our e-learning and to view a video on how it all works, visit our e-learning page here.