Latest Postings
July 18 2024

Power BI is a comprehensive suite of software services, apps, and connectors designed to transform disparate data sources into coherent, visually immersive, and interactive insights. Whether your data originates from an Excel spreadsheet or a hybrid combination of cloud-based and on-premises data warehouses, Power BI enables you to:
- Connect Easily: Access your data sources effortlessly.
- Visualize and Discover: Create compelling visualizations and explore what matters most.
- Share Insights: Collaborate by sharing reports and dashboards with anyone you choose.
The key components of Power BI include:
-
- Power BI Desktop: A Windows application for creating reports and models.
- Power BI Service: A cloud-based service for sharing and consuming insights.
- Power BI Mobile Apps: Available on Windows, iOS, and Android devices for on-the-go access.
Additionally, there’s Power BI Report Builder (for paginated reports) and Power BI Report Server (an on-premises report server). Depending on your role and project needs, you might use different elements of Power BI to achieve your goals. For instance, you can create customer engagement reports in Power BI Desktop, monitor real-time dashboards in the service, or even embed dashboards into custom applications using Power BI APIs. 🚀
Here are a few of our most popular Power BI courses:
New Visual Studio Workload Highlights Microsoft’s ‘Renewed Focus’ on WinUI
Developers doing Windows apps have a confusing arsenal of tools and frameworks to work with, but Microsoft is simplifying things a bit with a new Visual Studio workload that highlights the company’s “renewed focus” on the Windows UI Library (WinUI). Read the full article here.
If you or your team are looking for training to build apps, give us a call! Our expert instructors have been providing Visual Studio training for over 20 years! Let us tailor a class for your team to focus on what they need to accomplish. We have helped many organizations develop their own applications in-house instead of hiring expensive consultants, saving them time and money!

Excel Training in Sacramento
Remember, investing in Excel training not only benefits individual employees but also contributes to the overall success of the organization!
Why should you send your staff to Excel training?
- Enhanced Productivity: Excel proficiency streamlines data management, analysis, and reporting. Trained employees can work more efficiently, saving time and reducing errors.
- Data Accuracy: Proper training ensures staff understand Excel’s features, reducing the risk of data entry mistakes and improving overall accuracy.
- Advanced Functions: Training covers advanced functions like pivot tables, macros, and data visualization. These skills empower employees to handle complex tasks effectively.
- Cost Savings: Efficient use of Excel can lead to cost savings by automating repetitive tasks and optimizing processes.
- Certification Opportunities: Excel certifications (such as Microsoft Office Specialist) validate skills and enhance employees’ professional profiles.
- Customized Solutions: Trained staff can create custom templates, reports, and dashboards tailored to the company’s specific needs.
If you’re interested, reach out to us at ISInc! We offer public class dates, but you can also schedule a dedicated class for your staff, and we’ll tailor it to their needs so they can implement what they learn when they return to work!😊👍
Here are some of our most popular Excel classes:
July 23 2012

Office 2013 will soon be here, along with a new and improved version of the cloud-based Office 365. If you’re looking to upgrade, you have to decide whether the traditional desktop version of Office is the way to go, or if Office 365 is a better fit for your needs.
Office 2013 is impressive, but Office 365 is a better value in most cases.
1. Cost
Microsoft hasn’t yet shared what the price tag will be for the new Office 2013. But, unless it follows the same bold path laid out in offering Windows 8 for a mere $40, history suggests the new productivity suite will start somewhere in the $150 neighborhood.
Office 365 plans start at $4 per month. Small businesses can get access to Exchange, SharePoint, and Lync in addition to the core Office productivity applications for only $6 per month. Larger businesses that want to take advantage of Active Directory integration can do so for $8 per user per month.
Breaking those down, it takes more than three years to reach $150 based on the $4 per month plan, and more than 18 months under the $8 per month plan. The 18 months is less time than a business typically gets out of an investment in the desktop Office software, but it also comes with more than the software itself.
Of course, those are the current subscription prices and plans for Office 365, so those figures are subject to change as well.
2. Updates and Maintenance
What else do you get with your Office 365 subscription? An IT department. Sure, you can set up your own Exchange Server, SharePoint Server, and Lync infrastructure. You can manage and maintain the desktop Microsoft Office software, and install the patches and updates every month yourself. How much will that cost?
Consider that implementing the same capabilities in-house requires servers, and network infrastructure, and IT personnel to install, manage, update, and maintain it all. Plus, you still have to buy and maintain the Office software itself.
With Office 365, Microsoft takes care of all the dirty work so you don’t have to. Updates, patches, and upgrades just happen in the background without you needing to worry about it. When the server crashes, its Microsoft’s problem. When a hard drive needs to be replaced, Microsoft will handle it. You get the benefits of using Office without any of the headaches of updating and maintaining it all.
3. Accessibility
Office 365 lives in the cloud. That means you have access to Word, Excel, Outlook, and other Microsoft Office tools from anywhere you can get a Web connection, and from virtually any device–Windows or Mac desktops and laptops, Android devices, iPhones, iPads, and other smartphones and tablets.
Office Web Apps provide basic features and functions for free.This isn’t quite the selling point it once was for a couple reasons. First, even with the desktop Office 2013 suite Microsoft is pushing users to save files to the cloud-based SkyDrive, or to a SharePoint server by default. So, there’s no reason the data can’t be accessible regardless of whether you choose Office 2013 or Office 365.
The second reason it may not be all that compelling is that Office Web Apps are already available for free from the SkyDrive site. So, even without Office 365 users can create, view, and edit Word, Excel, PowerPoint, and OneNote files from the Web.
For businesses, though, SharePoint, Active Directory, and other elements of Office 365 that go beyond simply creating and editing Office documents still make Office 365 a better value.
Your mileage will vary of course. There are a number of factors involved in calculating the cost of purchasing, installing, configuring, updating, and maintaining Microsoft Office and the accompanying back-end services versus the ongoing subscription costs associated with Office 365. Office 365 is a solid service providing tremendous bang for the buck, though, so it won’t be easy to beat the value it brings to the table.
July 20 2012
I recently had an issue with a new install of SharePoint 2010. A user was trying to send/copy documents between libraries on the site, and the “send to” function was not available, it was grayed-out. After a little research, I found that there is an add-on in Internet Explorer that can cause problems with the “send to” feature of SharePoint. To fix this problem, go to “Manage Add-ons” in the Internet Explorer tools menu. Change the view to “show all add-ons”, and disable “STSUpld CopyCtl Class”. Your “send to” should now work without a problem.
-Mike
August 30 2011
While working remotely I noticed my bandwidth would drop when I connected to our VPN. It appeared that all internet packets were being routed through our VPN connection. While this normally wouldn’t be a problem, I often found myself downloading large files and my connection performance was limited to the available bandwidth to the VPN connection. That’s when I learned about what a “split tunnel” vpn connection is. I wrote this article to walk you through the process of setting up your VPN to take advantage of this option in Windows Networking.
With a “split tunnel vpn” connection, the internet traffic is routed through the local gateway connection. All other network traffic works through the vpn connection as you would expect. This is a feature that is available with Windows Vista and XP PPTP VPN connections, but it isn’t the default setting.
Here is how you configure your VPN connection to use the local gateway:
Step 1
Right click on your VPN connection and choose “properties”
Step 2
Click on the “Networking” tab. This is where we will need to make changes to the TCP/IP settings for your VPN connection. If you are using V6 IP addresses or V4, you’ll need to make the change in both locations just to be sure.
Step 3
Click on the “Advanced” button to get to the Advanced TCP/IP options
Step 4
The VPN connection by default configures all packets to route to the remote server’s gateway. We want to turn this option off by clicking on the “Use default gateway on remote network” option.
That’s it! Once you have made those changes you will notice your internet packets are no longer automatically routing through the VPN server.

August 18 2011

In this post we will look at how to create new document content types and insert the metadata fields in the header of the Word Document.
Creating the Content Type
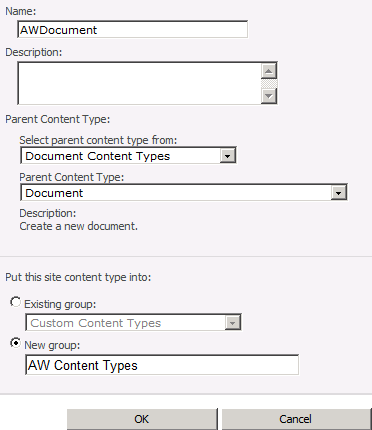
1. Make sure you are in the site where you want to create the content type. Click Site Actions | Site Settings.
2. In the Galleries section click Site Content Types.
3. Click Create.
4. Fill in the appropriate information on the form to create a new content Type. Give the content type a name.
Make sure to select “Document Content Types” on the Select parent content type from drop down menu. Make sure to select “Document” in the Parent Content Type drop down menu. Put the new content type in either an existing or new group. Click OK.
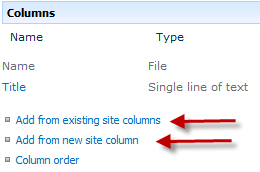
5. Scroll down to the bottom of the new site content type property page to find the columns section. Here you can either create new site columns or add an existing site column. The column will then be associated to the content type.
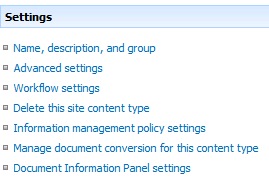
6. Content types can also have workflow, retention schedules and modified document information panels.
7. Upload a document template to
SharePoint Training
July 18 2011
You might be wondering, what is Microsoft Office 365?
It’s familiar Microsoft Office collaboration and productivity tools delivered through the cloud. Everyone can work together easily with anywhere access to email, web conferencing, documents, and calendars. It includes business-class security and is backed by Microsoft. Whether you are a small business or multinational enterprise, Office 365 offers plans designed to fit your organization’s unique needs.
There are two plan families available:
Plan P – for professionals/small businesses
Plan E – for midsize businesses and enterprises.
Microsoft Office 365 for professionals and small businesses
This service plan is designed for up to 25 employees who want:
•A solution without dedicated IT staff
•Essential email, calendar, and website services
•Free online community support
•Month-to-month subscription
Microsoft Office 365 for midsize businesses and enterprises
This service plan is great for any size organization that wants:
•Advanced IT configuration and control
•Office Professional Plus, Active Directory or advanced archiving
•24×7 IT Administrator support
•Choice between monthly and annual contracts
Please contact an ISInc account representative for more information, or email [email protected].
November 7 2008
If you spend any time coding CSS from scratch or debugging existing stylesheets, you know how tricky it can be to find that pesky error! Whether it is getting IE6 to play nice or just understanding where all that white space is coming from, these Firefox add-ons should help you do the job better and faster. I’ve only chosen a couple of my favorite add-ons and my favorite features of each. Feel free to include your favorite features or add-ons in the comments as this list is anything but exhaustive.
The Web Developer Toolbar by Chris Pederick has many useful features like an easy-access javascript disabler, a simple window resize to test 800×600 screen resolution, and an option to view all of the stylesheets associated with a page (easily searchable!).
One of my favorite features, however, is surprisingly simple and incredibly useful. Using the Outline menu, you can outline any block level element on the page with just two clicks of the mouse. Personally, I can end up spending minutes of wasted time adding borders to elements here and there trying to figure out why I am seeing too much or too little space in a certain area. No need to do that anymore with this feature. It outlines your div tags for you, making spatial debugging a much simpler and faster process.
My other favorite feature in the web developer toolbar is the quick access to the W3C XHTML validator. It will upload your local file and display your pass/fail status quickly and efficiently!
Next on my list is the Firebug add-on which again, has a wealth of useful and time-saving debugging tools. My favorite, by far, is what I’ve coined as their CSS specificity revealer. Ok, you got me, I just made that up. The feature I’m referring to goes something like this:
1. You add some CSS rule
2. Your CSS rule doesn’t work
3. You can’t figure out why it doesn’t work
4. You wish to yourself there was some tool out there that could tell you if someone wrote a rule that is somehow overriding your own
5. You realize that firebug has that very feature and you’re going to use it now!
Launch firebug after you’ve installed it and click the “Inspect” button at the top of the console. Now, watch the Style panel on the right hand side. As you mouse over different elements on the page, you will see which rules apply to which elements. You will also see which rules are being overridden by others as evidenced by the line through.
For instance, in the above example, the #description rule is overriding our normal <p> tag line height of 1.4em because #description is an ID (which will always have a higher specificity than a non-ID rule).
Personally, I think this feature of firebug makes it one of the best CSS debugging tools out there.
And remember, feel free to leave me some tips and tricks in the comments section if you have any!
October 10 2008
One of the interesting issues I have found when building reports in Crystal is the nature of their record selection on blank data. More »