While working remotely I noticed my bandwidth would drop when I connected to our VPN. It appeared that all internet packets were being routed through our VPN connection. While this normally wouldn’t be a problem, I often found myself downloading large files and my connection performance was limited to the available bandwidth to the VPN connection. That’s when I learned about what a “split tunnel” vpn connection is. I wrote this article to walk you through the process of setting up your VPN to take advantage of this option in Windows Networking.
With a “split tunnel vpn” connection, the internet traffic is routed through the local gateway connection. All other network traffic works through the vpn connection as you would expect. This is a feature that is available with Windows Vista and XP PPTP VPN connections, but it isn’t the default setting.
Here is how you configure your VPN connection to use the local gateway:
Step 1

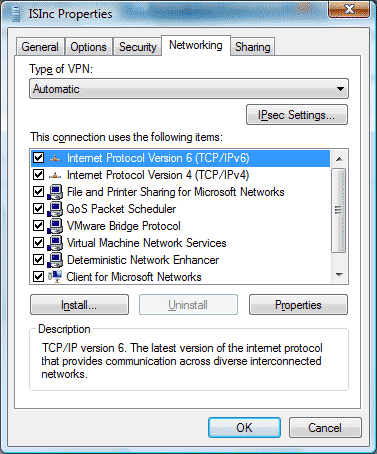
Right click on your VPN connection and choose “properties”
Step 2

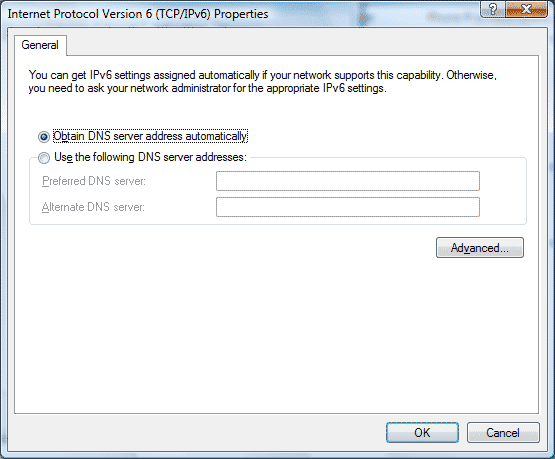
Click on the “Networking” tab. This is where we will need to make changes to the TCP/IP settings for your VPN connection. If you are using V6 IP addresses or V4, you’ll need to make the change in both locations just to be sure.
Step 3

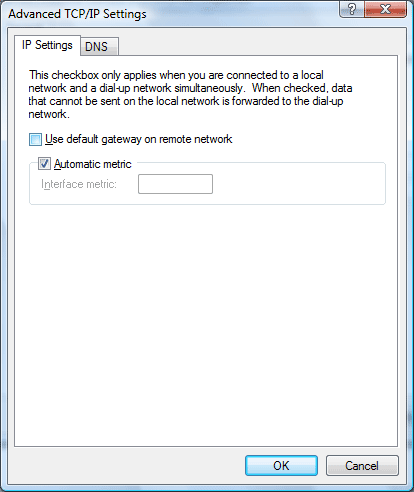
Click on the “Advanced” button to get to the Advanced TCP/IP options
Step 4

The VPN connection by default configures all packets to route to the remote server’s gateway. We want to turn this option off by clicking on the “Use default gateway on remote network” option.
That’s it! Once you have made those changes you will notice your internet packets are no longer automatically routing through the VPN server.

May 9th, 2008 at 7:28 am
Hi, I tried this and was able to connect to my vpn and browse the internet locally, but I’m unable to connect to anything through the vpn!
May 9th, 2008 at 8:30 am
Thanks! That was just what I needed, works like a charm!!!
May 20th, 2008 at 9:04 pm
I would like you to verify that you can actually use your VPN connection? Your method works great for Windows XP, but by default, split-tunneling is disabled with Vista’s strong host model, so unchecking the “use default gateway” option will make none of your packets go through the VPN tunnel.
There are a few netsh commands (weakhostsend, weakhostreceive) but I haven’t been able to get them working well.
I haven’t tried again since SP1, I’d like to know if it really is in fact working for you?
May 29th, 2008 at 4:15 pm
I am able to use my VPN. I have had success with both Vista and XP. I can still access my network resources and my internet traffic is not tunneling through the VPN.
June 9th, 2008 at 3:36 am
I tried this with my work VPN. Unfortunately, without the box ticked I can’t get at anything on the network. It’s as if it’s all or nothing, either I route absolutely everything through the VPN or I can’t access anything within the VPN. This is dumb. Actually it’s super-dumb. Sending packets destined for the internet through my VPN to work’s network and forwarding them on from there is a collossal waste of time. There must be a way around it, anyone know it?
June 14th, 2008 at 8:25 am
We run into bigger problems if users decide they want to actively harpoon network security by disabling the Use default gateway on remote network option. When users disable this option, a network route is added to the VPN client’s routing table, but it is not a default route. The route added sends requests for the classful network ID the VPN client was assigned for its VPN interface.
For example, if the VPN client is assigned an IP address 10.0.1.100, a default route for network ID 10.0.0.0/8 is set on the VPN client. All packets for that network ID (and all subnets of that network ID) are sent to the VPN server via the client’s VPN interface. All other non-local packets are sent to the ISP’s remote router. The VPN client now has a direct link to both the Internet and the corporate network, and can effectively become a gateway between the Internet and the corporate network. Do you see a problem with this?
There may be ways to prevent users from changing the gateway setting. The Connection Manager Administration Kit allows you to create VPN connectoids and there may be a feature that allows you to prevent users from changing this option. I know that on a Windows XP Professional machine, an administrator can create a VPN connectoid and set the option that it is available to all users. When an average user logs in, they cannot access the Properties dialog box. However, if users configure their own VPN connectoids, they will be able to make whatever changes they like to the connectoid.
Improve VPN Client Security with Off-Subnet Addresses
Perhaps a better way of ensuring the safety of your internal network is to design the IP addressing and routing scheme in such as way so that if users are able to set their VPN clients to not use the default gateway on the remote network, they still won’t be able to access anything other than resources on the ISA/VPN server itself.
The best way to do this is to assign the VPN clients off subnet IP addresses. An off subnet IP address is one that is not on the same network ID as the internal interface of the ISA/VPN server. For example, the internal interface of the ISA/VPN server is connected to network ID 10.0.0.0/16 and the VPN clients are assigned IP addresses in the 169.254.0.0/16 range. With this setup, VPN clients that are configured to not use the ISA/VPN server as their default gateway will be able to access resources on the ISA/VPN server, but won’t be access to access resources anywhere else on the internal network.
The reason for this is that that when the client is configured to not use the default gateway on the remote network, the actual default gateway on the client points to the ISP (the Internet). Therefore, any non-local requests (including those for network ID 10.0.0.0/16) will be forwarded to the Internet, which obviously won’t work. Even though the ISA/VPN server contains the proper routing table entries to forward requests to all the network IDs on the internal network, the off subnet VPN client won’t be able to take advantage of them because they are not using the ISA/VPN server as their default gateway.
February 4th, 2009 at 3:52 am
Ron –
Are you assuming they don’t have admin rights and are therefore not allowed to modify the routing table?
If the user enters a static route to the 10.0.0.0/26 network in their routing table, pointing at your VPN server, traffic for the 10.0.0.0/16 network would be routed via your VPN server.
October 25th, 2009 at 2:12 pm
For those who are losing connectivity to their VPN netwrok once they are connected using this method here is a quick guide on how to make it work for you.
Lets assume you are trying to RDP to your work PC but once you have your VPN connected with the tick box shown above deselected you can no longer connect.
What you need to do is set up a static route that connects the network your PC is on through your work network.
To do this connect your VPN, open up a command prompt and type ‘route print’
This will show you your routing table. On it there will be a route added for the VPN you are connected to.
for example:
172.20.0.0 255.255.0.0 172.20.10.36
Remember the thrid number in this route, it is the gateway you need to send any of your work traffic through.
Next ping your PC you are trying to connect to using the full domain name. This should hopefully give you its IP, if not then you will need to probably connect your VPN normally, connect to your PC and find out the IP from it that way. Lets say your PC has an IP of 172.15.40.25
Now just create a static route that connects the subnet your PC is in through the gateway found above by using the route add command as follows:
route add 172.15.0.0 mask 255.255.0.0 172.20.10.36
Now if you try pinging your PC again you should find that you are now getting replies.
October 21st, 2011 at 2:31 am
It’s becoming really easier now after your explanations!